
Vintage Bottle Brush Tree Decoration DIY: Part II
There’s something magical about handmade Christmas decorations—especially when they blend nostalgic charm with a touch of creativity. This holiday season, bottle brush trees and vintage containers are the perfect pairing for a DIY project that feel both whimsical and timeless.
Whether you’re repurposing antique teacups, weathered tins, or old brass fittings, these miniature evergreens bring a cozy, storybook quality to any space. In this post, we’ll explore how to combine these quaint elements to create festive displays that are easy to make, delightfully unique, and full of vintage holiday spirit.
Oh, and if you’re a vintage seller, these sell like hotcakes for $8 to $12 each. See Part I here.
Materials for Bottle Brush Tree Decorations
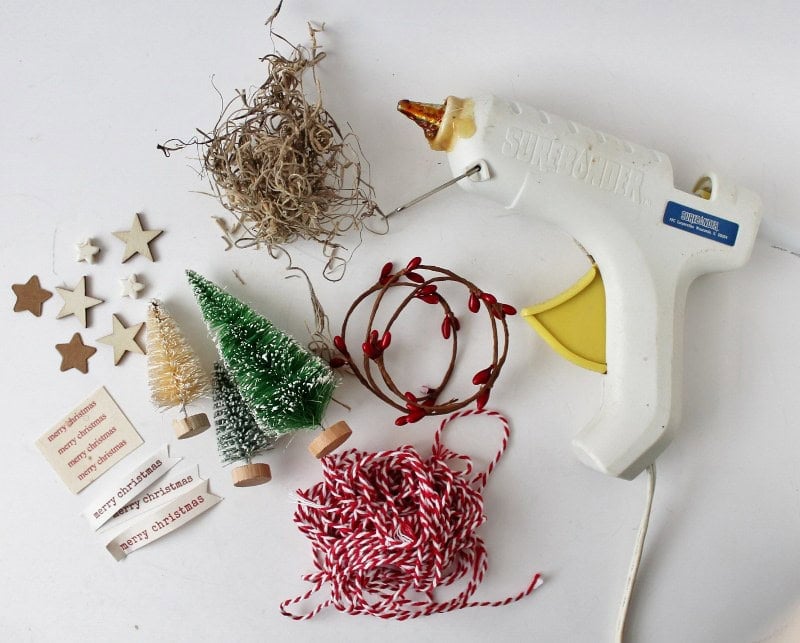
Materials:
- Bottle brush trees
- Interesting(vintage-y) small containers or fittings: Tart tins Peat Pots Plastic Chinese Tea Cups
- Hot glue gun
- Styrofoam
- Spanish moss
- Stars: Ceramic Beads Wood Plastic Beads
- Sizzix Big Shot die cutting machine Star die
- Red berry garland
- Mercury glass beads: Faux mercury glass beads
- Baker’s Twine
- “Merry Christmas” tags: Get free access to a sheet of these tags in the Member Library when you subscribe to my newsletter
Find Potential Bases

Look through your craft stash (or hit the thrift store) and I bet you’ll find all sorts of small bits and pieces that you can use to make these cute little decorations.

I usually make them in batches to save time and start by picking out a few potential bases, which is what I did above.
Match Trees With Bases

Then I sort through my bottle brush tree stash and match the various styles and sizes to the bases I’ve picked out.
Connect Trees to Bases
Next it’s time to secure the trees to the bases. I use both small containers and interesting fittings, so I’ll share I how I make both work:
In Containers

Cut the styrofoam (easily with scissors) and press it into the container. You want there to be room for the base and trunk of the bottle brush tree.
Next, apply hot glue to the base of the tree you’ve chose to use and press it firmly onto the top of the styrofoam.
On Small Fixtures

A fitting, like this brass one, that’s a bit elevated and has a hole in the center, is perfect for this project. First, remove the base of the tree with pliers; then apply hot glue around the hole (where the tree’s branches will rest). Press the tree in place.

Here’s the finished product with some added embellishments.
Add Spanish Moss to Containers

I like to add some Spanish moss around the base of the tree (top of the container); I think it really compliments the project. Press it down into the container a bit and let some of it sort of billow out. Trim with scissors if necessary.
No need to glue it since you pressed it in and the moss fibers will mix with the pine needles, which helps hold it in place.

Here’s the finished decoration with a combination of Spanish moss and red berry garland.
Decorate
Now it’s time for the fun part: decorating your tree. See Materials above to find Amazon links for products similar to those I use below.
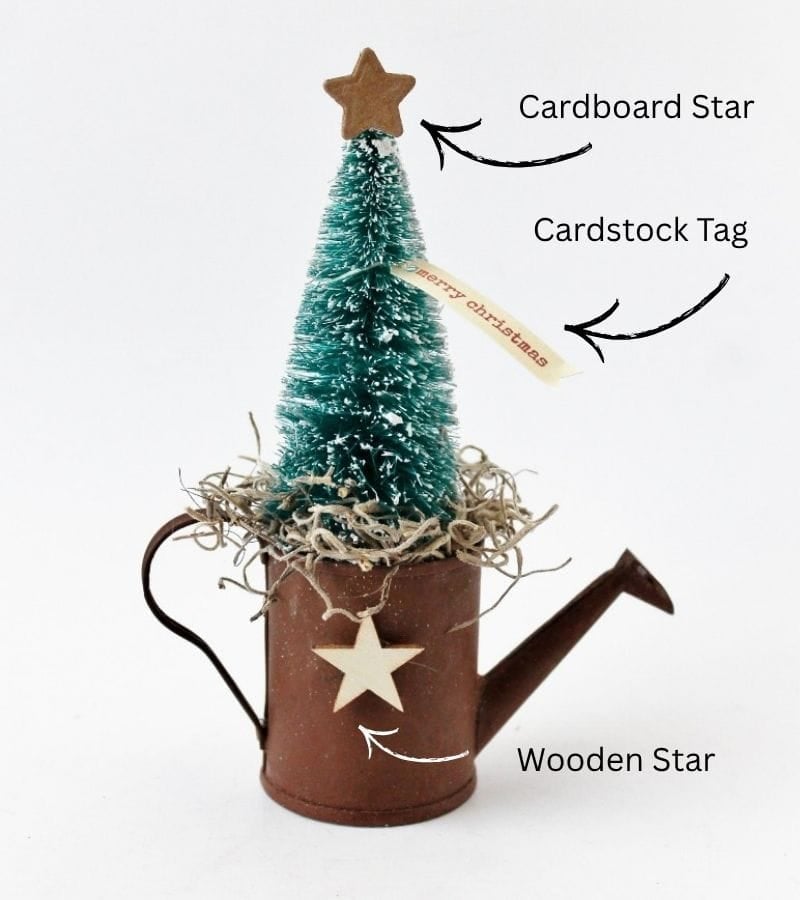
- Cardboard star: I made mine using the Sizzix Big Shot die cutting machine*
- “merry christmas” tag: I print multiples on cardstock; subscribe to my newsletter to get access to a printable sheet of these in my Member Library
- Wooden star: A craft store find
* I LOVE my Sizzix die cutting machine! It’s easy and fun to use and it’s manual (not electric). I use it to make this star ornament, these fabric flowers, and these paper flowers.

- Ceramic bead star: Found at a craft store. I liked pairing the white star with the white ironstone (child’s) tea cup
- “merry christmas” tag: I print multiples on cardstock; subscribe to my newsletter to get access to a printable sheet of these in my Member Library
- Red berry garland: Sometimes you can find this at the Dollar Tree

Sometimes all that’s necessary is to add just one element, like the antique mercury glass beads I hot glued onto this tree in a tiny asian urn.
Other Vintage BB Tree Decoration Examples

Thrift stores and garage sales are filled with all sorts of suitable, small containers. This birch bark example is one of my favorites.

I often come across antique milk glass jars like this one at sales for just a quarter or fifty cents. Finding containers at this price point ensures a good profit on each decoration.
The moose (a perfect embellishment) was actually a button; I removed the shank and hot glued it right onto the plaid ribbon.

Here you see other examples of brass fitting bases, along with a small glass cabinet knob.

I picked up a set of small tea tins, including this Christmas-y red plaid one and have steadily been making these decorations using them.

Tart tins in various sizes (and ages) also make good bases for this project.

When I come across interesting pieces like this farmhouse style crate, I pick them up and fill them with multiple trees in various sizes.
Decorating with just some red berry garland and a “merry christmas” tag resulted in a very attractive piece.

Same with this small galvanized tin. Various sized trees, a little Spanish moss, and a tag were all that was necessary to create this cute decoration.
Final Thoughts
As you decorate your home or antique booth this season, consider making a few of these bottle brush decorations. They promise to add some rustic appeal to your holiday celebration (or sales!).
Thanks for stopping by–
If you enjoyed this post, subscribe today
and get a FREE copy of my eBook:

Bye for now,

Would you help me out by pinning this image? Thx!

I am not crafty at all but I think I could do this. I have things already collected that be perfect for this . thank you for the great ideas.
wendy
You’re welcome Wendy! Have fun crafting 🙂
Well, there sure isn’t any shortage of AMAZING bottle brush tree arrangements! Gorgeous! All of them! But now I do have a shortage of trees… off to the store I goooooo!
You are so kind Donna! Thanks for the supportive comment and for featuring this project on your [amazing] website: Funky Junk Interiors. All my readers should head on over and check out your fab, rustic DIYs 🙂
So many great ideas! Thank you! I’ve been collecting trees all year …. Off to the craft room!
Have fun with your trees, Paula! So glad you like the projects 🙂