
Upcycled Cardboard Star Ornaments [Quick & Easy]
If I told you that you could make adorable ornaments out of cardboard, would you believe me? Well you can!
Today I’m going to pass on how I make upcycled cardboard star ornaments with cardboard (of course) and a few other materials.

I’m having all kinds of fun with glitter this year and am especially enjoying my new color: aqua.
Note: This post contains affiliate links for [the same or similar] products used to complete this project. This is both for your convenience as well as to support my website, since I receive a small compensation whenever you click on a link and make any sort of purchase, for which I thank you 🙂 See my full disclosure here.
Materials for Making Cardboard Star Ornaments
Materials:
- Scrap cardboard (here’s some heavy cardstock)
- Vintage music paper (here’s some scrapbook paper)
- Sizzix die cut machine
- Star die
- Mod Podge
- Glitter
- Hot glue gun
- Embellishments: e.g., small bells, red berries, etc.
- Christmas stamps with words like “noel” or “joy” or “merry”
- Thin textured paper, like vintage typing paper (for mini banners w/words)
Where to Source Good Cardboard
First, a note about cardboard. I’m always on the look-out for good cardboard, free from print on both sides. I’ve got a pretty good stash of it right now because I “rescued” a rather large piece from the flour pallet at Aldis.
They use a very large piece of medium-weight cardboard, in a nice farmhouse-y shade of brown, to separate each row of flour on a pallet.
A couple of months ago, I grabbed one and brought it home with me. I cut it into smaller pieces to make it easier to store.
Alternatively you can use heavy cardstock, which I’ve linked to above in the materials list.
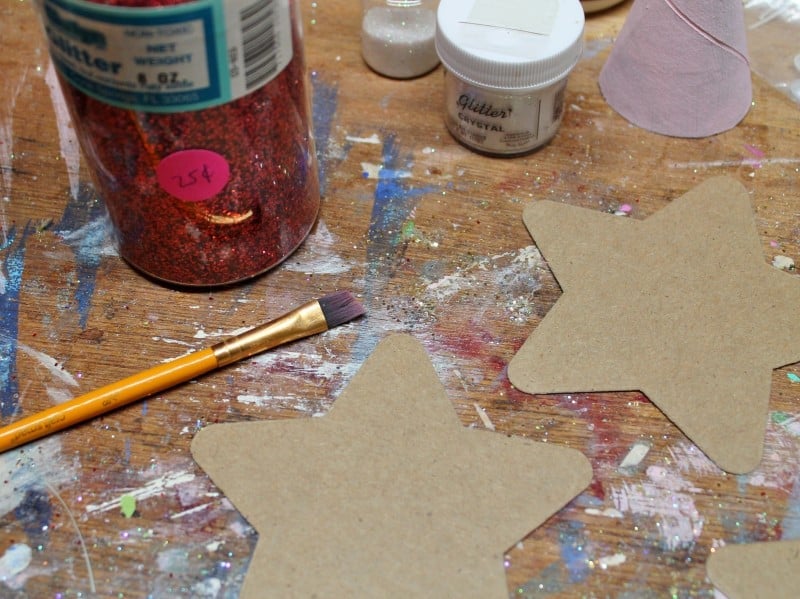
Making the Star Shapes

Glue small pieces of music paper (based on the size of your die) to matching pieces of cardboard. Set your star die on top of the cardboard and run it through your Sizzix machine.
I use my manual Sizzix machine all the time and highly recommend it for projects like this.
If you don’t have one, then make a cardboard star template, trace a bunch of them on your music paper/cardboard, and then cut them out. 4″ across is a good size for this project.
Decorating Your Star Ornaments

Some of my stars I covered completely with glitter, using Mod Podge to adhere it. I applied an even coat of Mod Podge with a foam sponge and then poured glitter over the entire surface. I tapped it lightly to help the glitter adhere better.

On other stars, I just glittered the edge.

On some of the fully glittered stars, I simply tied on a bell and glued a Christmas banner across the front. If you don’t have any Christmas stamps, you could write some out by hand or print them using your computer.
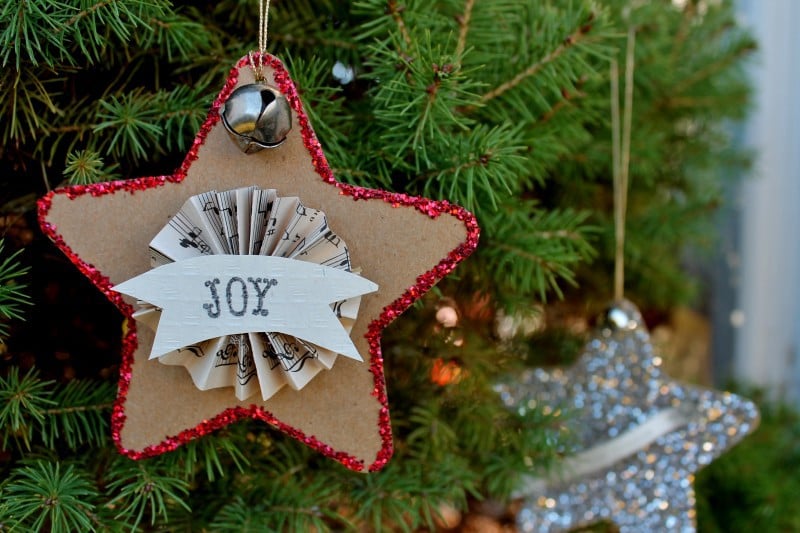
For others, I made vintage paper rosettes and then glued a small banner on top.
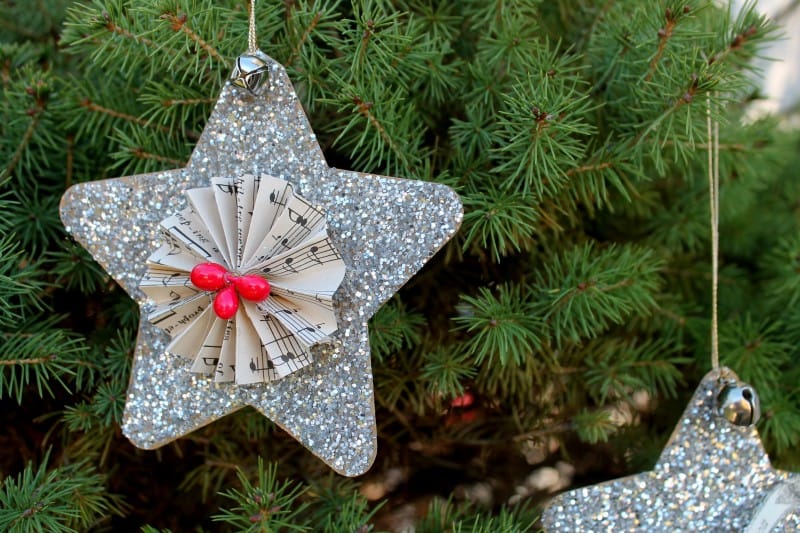
And others, received a few berries for embellishment.
How to Make Paper Rosette Embellishments
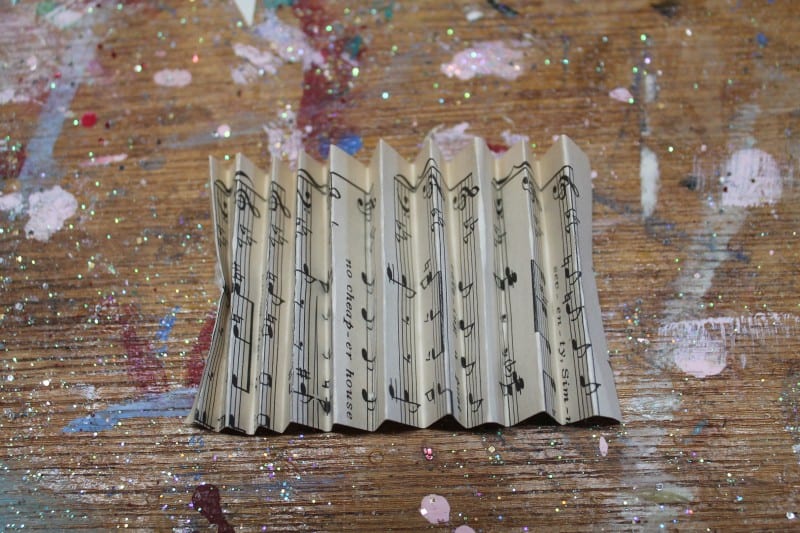
To make a rosette, cut a 2″ x 7″ piece of vintage music paper and fold it 1/4″ at a time like an accordion.

Fold the accordion in half and apply hot glue down the center as show above and press the two “ends” together. Turn the rosette over and fold in half the other way and glue as above. (It’s all easier and simpler than it sounds!)
")
Now you’ll need to put little dabs of hot glue between the folds (but just in the center of the rosette) to make your round, rosette shape and hold the whole thing together.

Use a last dab of hot glue to attach your rosette to your star. To finish it off, attach a bell using thin cord or string and glue a banner on top, and your done.

Your ornaments are ready to hang on the tree.

Or to accent your “brown paper packages tied up with string.”

I think they make the perfect addition to my holiday packages. What do you think?
Some other Christmas ornaments you may enjoy:


Thanks for stopping by–
If you enjoyed this post, subscribe today
and get a FREE copy of my eBook:

Bye for now,

I’d love it if you’d pin me!

Wonderful! I have never used or purchased a die cut machine… yours worked out great for these ornaments! Thanks so much for sharing your post with “Let’s Talk Vintage!”
Cute idea for a craft!
Love this craft project. They make nice tags to become an ornament.
Great idea for a frugal yet festive ornament or gift tag!
I love the tags. Thanks for showing how to fold the paper I never can seem to do it right. Merry Christmas Jo
So clever and cute Diana. Love these as tags and then an ornament. Happy Holidays.
Kris
Very nice! I liked the aqua, too. Merry Christmas, Janet
These are adorable, Diana…great on presents and it’s a little gift in itself, too as an ornament!
These are SO pretty and SO creative. I love the special touch of glitter! Thanks, Diana, for sharing your tutorial at VIParty.
Diana – the stars are so gorgeous and such awesome methods of display. They have such a wonderful charm fitting of all your posts. I am so delighted to have found your blog and love your ideas and information.
Thank you!
JoanMarie
These are just sweet, and I had to pin them for future reference!
Thanks for showing us how to make these – must make more of an effort with my Christmas decor!
Liz @ Shortbread & Ginger
Diana, all the stars are gorgeous!! I love a good craft as well so if I have some time I’ll give it a try with my girls, we all love glitter. And thanks for the tip on how to make the rosettes, I have made some but not that way, it seems easier than mine.
I would love if you share this with us at the party we host each Tuesday which is called Two Uses Tuesday.
Happy Holidays and Merry Christmas!!
Very pretty Diana … look great on the tree or packages. Thanks for the tutorial.
Thanks for all your work in bringing us the Vintage Charm link party.
Happy New year.
Audrey Z. Timeless Treasures
Well, I think they all are just darling and I’d say you got your money’s worth. 🙂 Love using rosettes. I have had glitter all over my basement kitchen after working on smash books with some friends. Thanks for sharing with SYC.
hugs,
Jann
What delightful ornaments! And I appreciate the descriptive photos you’ve included with the various steps. Well done!
These are adorable. SOMEDAY, I am going to make flat ornaments to also use a package tie-ones. Maybe if I start in July! Mailing bows just doesn’t work!
These make great gift tags Kathy and would solve your crushed bow problem 🙂