More Upcycled Bracelets from Vintage Belts
Hi everybody! Not too long ago, I posted about some cool bracelets I made from old belts. My sweet daughter and her friends thought they were pretty neat, so they’ve been buying more belts for me to get crafty with.

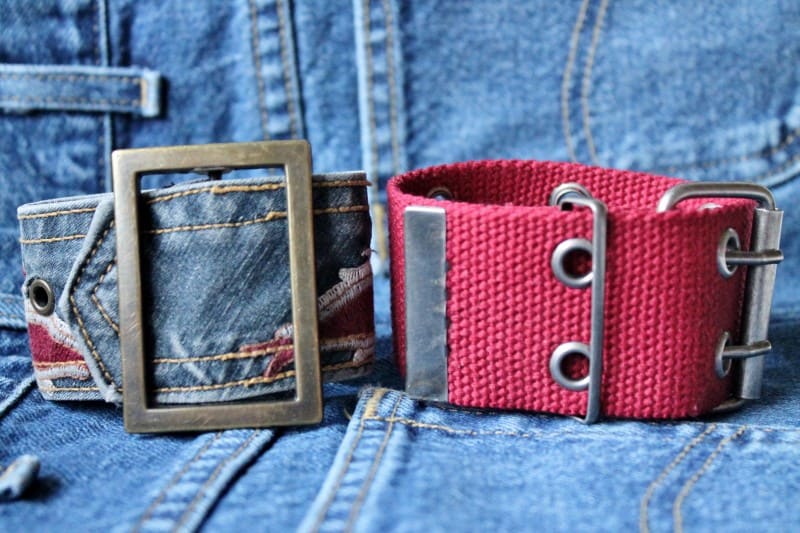
The denim bracelet on the left required a small amount of sewing, while the one on the right involved removing the metal piece on the end of the belt, and then reapplying it after shortening the belt to bracelet length.

Let’s start with the denim bracelet. First I removed the buckle from the belt, and then I removed the metal prong [that slides into the belt grommets] from the buckle using pliers. Starting from the finished, pointed end, I measured out my wrist size, added an inch for comfort, another inch for sewing, and another couple of inches to thread through the buckle.

Of course I didn’t take photos as I was going along, but I do have this nifty diagram that I hope helps. You want to sew the cut edge of the bracelet around the center, metal bar of the buckle.

Your final step is to thread the pointy, finished end through the buckle and tack it into place on the sides with a couple of stitches, and you’re done.

For this army/navy style bracelet, you do not remove the buckle or the prongs. Because the eyelets run the entire length of the belt, you can cut it down, making a “mini” belt, and it will still functions properly.
Again, no photos of the process, but this diagram may help. Cut the belt to bracelet length, plus a couple of inches for threading through the buckle. Then remove the metal tip using a flat head screwdriver to pry it up (it has little teeth that grip the mesh of the belt). Next, replace the tip onto the cut end of your bracelet. Tuck the cut ends into the mouth of the metal piece and gently pound it closed with a rubber mallet.

This is an easy, fun little project, much easier than the directions sound.

If you decide to give this project a try, go to the belt section of your favorite thrift store and try them on your wrist. Examine how they are made and determine whether you can easily turn them into funky looking bracelets. Every belt is different. The style of belts I used in my original post differ from these two, yet they came out great.

If you have a daughter or granddaughter, this would make a fun project to work on together. The young girls I’ve shown these to really like them, and in fact, my sweet daughter just bought me two more vintage belts to upcycle.
Not ready to make your own bracelets yet?
Some of mine are available for sale in my Vintage Shop.
Press the “Handmade” button

If you like what you read today, I hope you follow me by email.
Sign up on my sidebar and you’ll never miss a post.
Let’s connect!
Facebook
Pinterest
Instagram
Twitter


Hi Diana! 🙂
These are so neat!
I was always a bit of a rebel in school, style wise and always wanted to have something different that no one else had – these fit the bill perfectly! I love the jean one!
Great repurpose!
Have a wonderful long weekend!! 🙂
Kimberley
Thanks so much Kimberly! It wouldn’t be too hard to have a whole “wardrobe” of these bracelets 🙂
LOVE THEM !! i am going to use my old groovy belts to make super awesome bracelets !! I love your blog !!!
You are too kind Mary Jo!! Thanks for the encouragement–you made my day 🙂
Super cute.
Have a great holiday week end.
Kris
Thanks so much Kris!
Really cute, Diana!
Thanks Rita!
Love these! Thanks for the little tutorial!
Tania
You are so welcome, Tania 🙂
Love this! Especially the denim one- I’d wear that!
Thanks Kathleen–you are so encouraging 🙂
Diana, I love the idea. They are so in and very vintage! Jo
Thanks so much, Jo!!
Great looking vintage bracelets – thanks for the tutorial.
Thanks Donna 🙂
Adorable bracelets! I’m definitely going to try making one. They would make perfect Christmas gifts for my daughters.
Yay! I’d love to see them Sharon 🙂
Love them Diana, especially the denim one. Thanks for the nice tutorial. Have not seen the denim belts but will be on the lookout for one.
Thanks Audrey. I can’t stop looking for them now that I know they can be bracelets. I just bought a super cute textile and leather one that is going to be darling (I hope!).
These are really fun, Diana!
Thanks Linda!