
Make the Cutest Vintage Style Mini-Wreaths You’ve Ever Seen
If you’re a crafter looking for a simple Christmas project idea, then you’ve come to the right place. Every year I participate in an eight-week Holiday Market, so I always have my thinking cap on to come up with new (and profitable!) vintage Christmas craft ideas.
Today’s mini-wreaths fit the bill because I use them to decorate scads of different vintage items, like graters, door knob plates, folding ruler stars, and bingo cards. This little project has definitely stood the test of time and the items I use them on sell well year after year.

I made these little darlings one January, fooling around after the holidays with some left-over crafting materials.
Wreath Making Video
You can watch this video, which takes you step-by-step through the process of making them, or simply read the post below (or do both, LOL).
Materials to Make Mini-Wreaths

This post contains affiliate links for products necessary to complete this project. This is both for your convenience as well as to support my blog, as I receive a small compensation whenever you click on such a link and make any sort of purchase, for which I thank you.
Materials:
- Pine pipe cleaners (or garland)
- 1/2″ Antique white cotton seam binding (this is the closest I could find to my antique seam binding)
- Manila card stock (to create Merry Christmas tags)
- Aging spray (strong coffee + a pinch of alum)
- Your computer
- Hot glue gun

You can find the pine garland in 12″ pipe cleaner lengths or by the yard on rolls, depending on where you look for it.

I used antique cotton seam-binding for the bows because it helps create the farmhouse look I’m after since it’s ivory-colored and has no glossy finish whatsoever.
Step 1: Cut & Shape Your Mini-Wreath
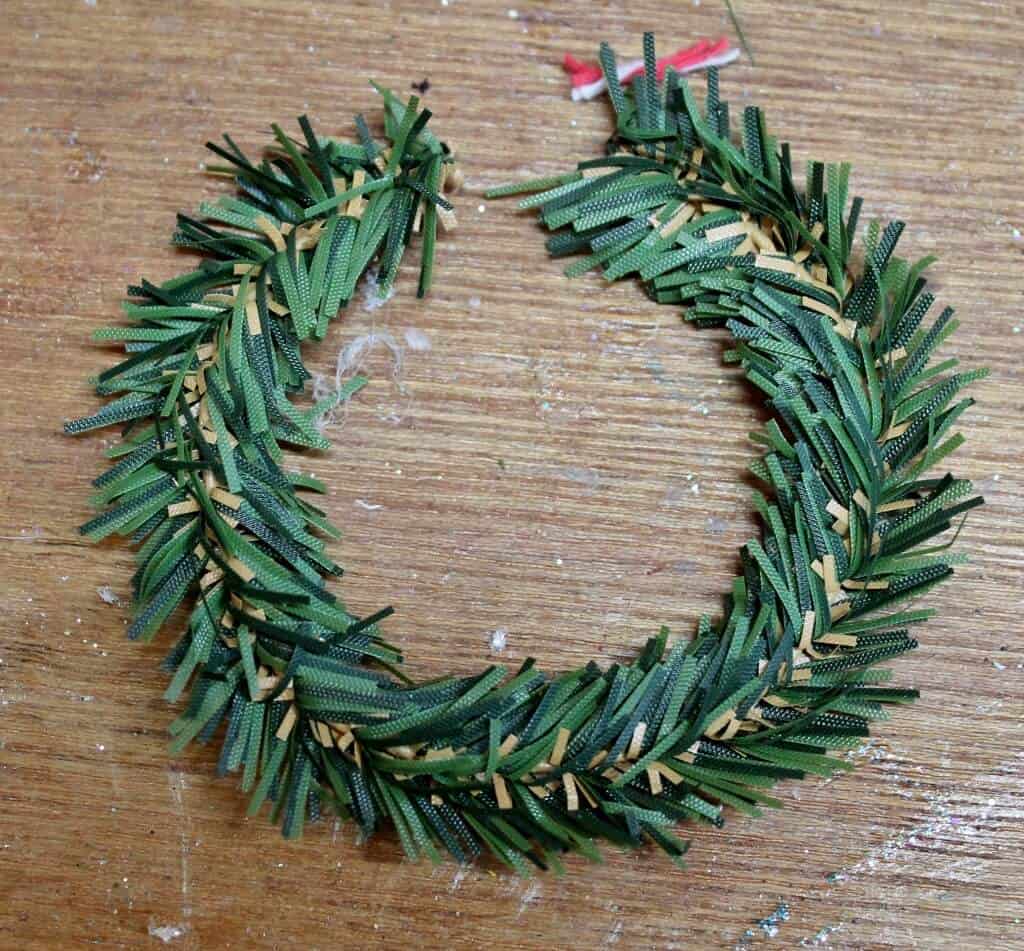
I had purchased a package of the pine pipe cleaners but hadn’t found a use for them. Like I said, I started fooling around with them. I realized that if I cut them in half (6″), I could shape them into cute mini-wreaths.
Step 2: Hot Glue Your Mini-Wreath Together

Hot glue the two ends together. I chose to decorate them simply in the hopes of giving them a vintage, farmhouse look.
Step 3: Create Your Merry Christmas Tags

Method 1: Print out a page of these “merry christmas” banners (from the Member Library) on manila cardstock. On three pages you’ll find two sizes and two colors (red and brown).
Gain access to the Library “printable” page by subscribing to my weekly newsletter.
Age the page with “aging spray” (strong coffee made with instant coffee in a small spray bottle). Lightly spritz the page and let it dry before cutting the words out.
Method 2: Type up multiple “merry christmas” banners on a computer page and print them out on manila cardstock. I used a vintage typewriter style font in 12-point size. Follow aging instructions above.
I created red, black, and brown versions, but I like the red the best and tend to use them on all of my wreaths. I also like the look of all lower-case letters. Fiddle around with different looks and see which YOU like best for your wreaths 🙂
Step 4: Make Bows
")
Make small bows using your vintage or antique white seam binding or ribbon.
Step 5: Put It All Together

Now it’s time to put it all together by gluing on your bow and “merry christmas” tag. It will take you about 30 seconds!
You can also tie a piece of plain antique white baker’s string to the top to allow you to hang it from your tree or from a cabinet knob.

As an alternative to the cardstock “merry christmases” you can also make little banners like you see here. I use Christmas rubber stamps and some antique white paper to create them.
I enjoy making the wreaths so much, the next thing I knew I was decorating everything in sight with them! In fact, you’ll find a number of ways to decorate with them in this post: creative ways to use mini-wreaths.

This funnel Christmas tree is one of the first creations that I attached a mini-wreath to; it’s available at the Shaker craft fair going on right now. You can see in the background, I tacked wreaths onto rusty hearts to create a unique ornament.

Projects Using Mini-Wreaths I Know You’ll Love:


Final Thoughts
Have you started working on any Christmas projects yet? Normally, this would be a bit early for me, but because of the craft fair, I start developing ideas in January. I can’t wait to share more of them with you as we lead up to Christmas.
If you enjoyed your visit, I hope you’ll subscribe!
You’ll receive a FREE copy of my mini-eBook:
10 Vintage Items Often Overlooked & Undervalued at Garage Sales

Bye for now,

I’d love it if you’d pin me for later 🙂

Very cute! Does the coffee spritz give it much of a coffee scent? Or does it dissipate? They look very nice added to the other goodies.
Really cute Diana and just perfect for decorating packages. Would even make pretty napkin rings.
Thanks.
These are adorable Diana. Thanks for this idea. I can see these hanging from my mantle.
Blessings
PS Amen to your mini sermon.
Love these, Diana! They are so cute. Simply adorable. I would love to see some of the wreaths you made from the red tinsel. Your mini sermon was a blessing to me today too.
Hi Diana, I have worked with that garland for years. And, it is amazing what you can do with it. Whenever I see some in thrift stores or on sale, I grab a roll, no matter what color it is. Thanks for th cute tutorial, I’m sure lots of little wreaths will come into being, because of your post, Sandi
No, I haven’t started on any Christmas projects yet. Yes, I know I’m way behind but your projects have encouraged me to get started.
Diana, I love how you call our God “the One-Who-Made-You”!! Thank you for your thoughts in your post. Where did you find your antique white baker’s twine? Have fun creating!!
I can’t figure out which I love more… the wreaths or the tree. BOTH! Gorgeous!
I’ve featured you this weekend on DIY Salvaged Junk 354. Thanks for linking up! 🙂
Diana these really are the cutes wreaths ever! Everything looks cuter when it is in mini size! I also love your aging juice, very clever idea. Pinning to use this for the future.
Thank you for both the inspirational preach and the wreath idea. It looks like an easy and quick project!
OMG! Thank you SO much — I’m wreath crazy too now! THis year I will be decorating every utensil, star, watering can, etc. I can find! And the little tags….perfect instructions!
You are most generous to share your knowledge and encouragement..thank you so much!
Paula
I have had the best time making these out of plain old fat green pipe cleaners, your pine pipe cleaners, a leaf garland, and fat curly green pipe cleaners. They are cute on backgrounds of the upholstery webbing with a jute hanger and little bow or ribbon. They can be very rustic or farmhouse, depending on the trim used.
I’m so glad you love them as much as I do Kathy! I love them with the jute webbing–so glad you discovered that. Nothing makes me happier than when I’m able to inspire a fellow crafter 🙂