
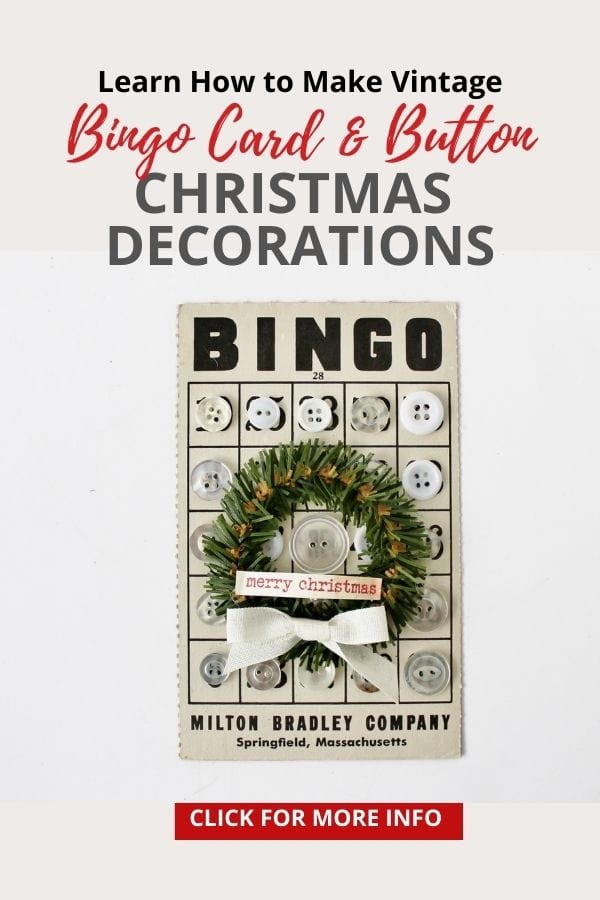
Vintage Christmas Decoration (Bingo Card & Button)
If you’re like me, then you’re always considering how to use vintage and antiques in creative new ways. Today’s project utilizes some of my antique bingo card and button stash to make a farmhouse style vintage Christmas decoration.
You can use them to decorate your home, give as a hostess gift, or sell from your vintage business. I started selling mine last year at the Shaker Holiday Market with good success.

Note: This post contains affiliate links for [the same or similar] products used to complete this project. This is both for your convenience as well as to support my website, since I receive a small compensation whenever you click on a link and make any sort of purchase, for which I thank you ☺ See my full disclosure here.
Materials

You’ll need some vintage bingo cards and buttons (of course).

Along with a few other items.
Materials
- Vintage Bingo cards (or use these and age them)
- Buttons (green, red, & white)
- Tacky glue
- Pine pipe cleaners (or thin 1/2″ pine garland)
- 3/8″ Antique white seam binding (or try this 3/8″ cotton twill tape)
- “Merry Christmas” tags (subscribe to my newsletter to get this free downloadable in my Member Library)
- Hot glue gun & glue sticks
Step 1: Glue Buttons to Bingo Card

The first step is to attach your buttons to the bingo card. Squirt a dab of tacky glue onto the center of each square and top with a button. Press to secure and allow time for them all to dry.
Step II: Make a Mini Wreath

Have you been following along for a while? If so, then you’re familiar with this cute-as-can-be mini wreath.
Find super easy directions (and a video!) to make these little gems HERE. Use hot glue to adhere it to the center of your button-filled card and you’re done!
Discover eighteen more ways you can use these wreaths to embellish all sorts of vintage and antiques.
When you subscribe to my newsletter, you gain access to my Member Library (link in navigation bar above). There you’ll find these “merry christmas” tags that you can use on your mini wreaths.
I print mine on cream-colored card stock and often “age” them with “aging spray” (instant coffee mixed with water in a spray bottle).
Step III: Optional Hanging Ribbon

If you’d like to make your bingo cards hangable, simple add a bit of ribbon to the top. Punch two holes (I use an 1/8″ hole punch), string ribbon through them and tie knots on each end.
Learn how to make music paper rosettes HERE.

Here’s the finished product, ready to go to my holiday market booth. I display them in (1) a small rectangular, green pottery planter and (2) leaning against the back wall of my shelf to create a nice backdrop for other items I have on sale.
I have loads more vintage craft projects to make and sell if you’re a holiday vendor like I am. This is my 8th year participating in the Shaker Holiday Market and I LOVE it!
Alternative Colors

I experimented with a couple of new colors this year. This red one flew out of my booth within a couple of days.

This green one is still available if you’re local ☺
Conclusion
So far these Christmas decorations are selling well from my booth at the Shaker Holiday Market. It runs from October 10th through December 17th. I price them at $12 each. Let me know in the comments what you think and if you plan to give them a try!
Other Projects You’ll Enjoy


Thanks for stopping by–
If you enjoyed this post, subscribe today
and get a FREE copy of my eBook:

Bye for now,

I’d love it if you’d pin me for later!
)
I loved the new Bingo cards with colors! Hope your Shaker sale is going well. In midst of Christmas crazies here. Did some more wrapping this a.m. Trying to make more room!
I just couldn’t love these vintage Bingo Card ornaments more! Each one is SO adorable and unique!
So glad you like them Donna–thanks for the feature on your website. It’s much appreciated!! Hope your Christmas was amazing and that your new year is filled with many blessings 🙂
Very cute! I’m going to try these for next year. I have loads of buttons! Thank you!